Presentation Manager Training
- Setting yourself up to succeed
This skill is about organizing your work environment and being efficient when preparing for your team meetings before and during the course. There are several topics in this skill.
1 — Managing file structure
During the day, you will need to access the video files, and PowerPoint slide deck reliably. If you have all the files you need to use for each day you will be able to access then more quickly and reduce the chance of error.
(Zoom remembers the last file location that you used, so you will autmatically be in the right location when you need to open the next video)

Bonus tip: inserting a bullet character before the name of the folder will force it to the top of the list when sorted alphabetically by name.
2 — Mastering volume controls
Zoom remembers the volume setting between video-sharing sessions during a meeting. Therefore you can set the video volume for the Welcome video ahead of time. AND, you must remember to set the volume for the Vanto and Special videos correctly when you share those videos.
How to set the video volume.
When you are sharing a video, hover your mouse over the video. You will see the video controls. The volume control is in the bottom right corner of the window. place your mouse cursor over the speaker icon the volume control slider will appear.
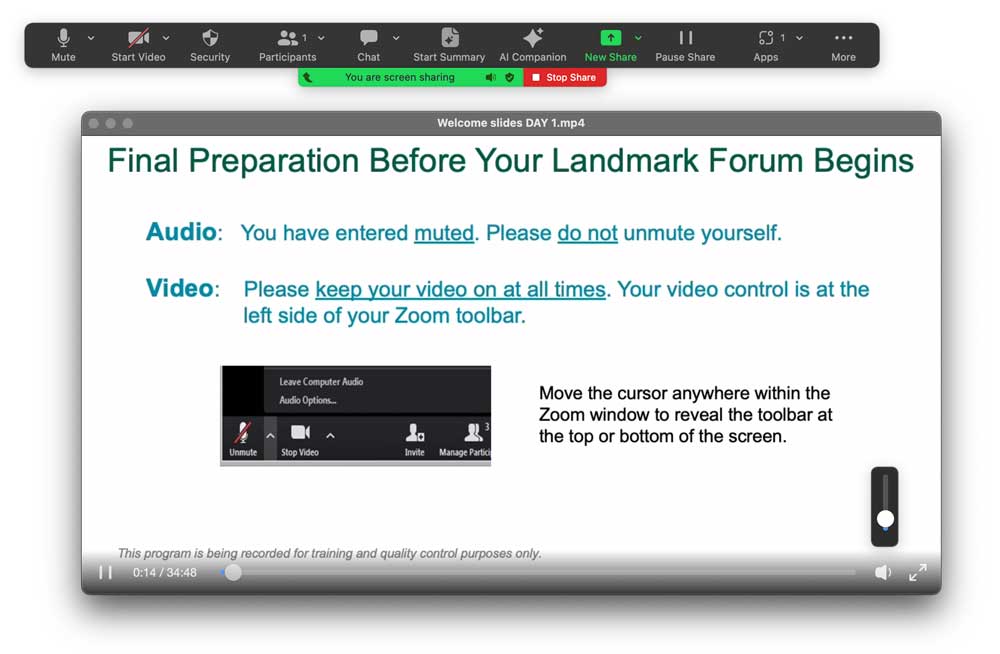
Setting the volume for the Welcome videos
The Welcome video will play during the half hour before the start of the day. The intention is to have background music that sets a mood, though not so loud as to disrupt anything else that may be happening in the participant’s environment. The volume in zoom should be as low as possible without being off… think of “hotel lobby” music.
Setting the volume for the Vanto and Special Videos
When sharing the Vanto video, or other special videos, set the volume to approximately 75% or 3/4. the minute the video starts playing. Monitor the volume to ensure that it is correct when the speaking starts. then do not adjust it for the rest of the video.
Bonus tip: there is no audio in the Break Timer Videos. Therefore you can use that time to set the audio volume in the Zoom video player to 75%. That way you will be ready to show the Vanto video with the sound set to the right level.
3 — Checking transfer speeds
You need to have a reliable internet connection to be able to share videos accurately.
The requirement that we have set is that you have to have a sustained upload speed of 10 Mbps (megabits per second). If you do not have this requirement please make arrangements to either get a better internet connection or arrange for another person to function as presentation managers.
To check your Internet connection speed, go to https://speedtest.net or download the Speedtest app.

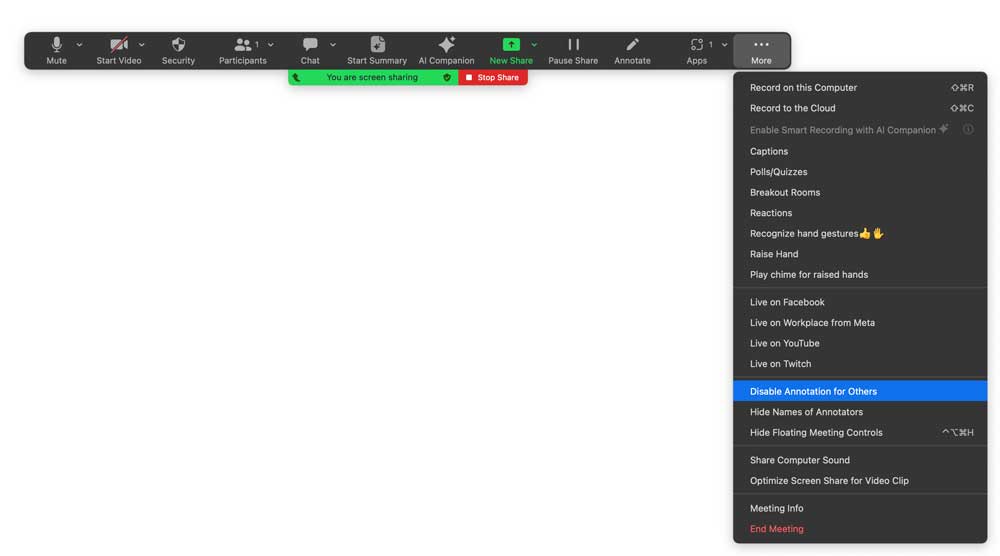
4 — Disabling Zoom annotation
The Zoom annotation feature allows meeting participants to draw, highlight, or add shapes directly onto shared screens or documents during a Zoom meeting. We turn this feature OFF (i.e. disable annotation for others) during the course to avoid disruptions during the course.
To disable annotations for others you have to first be sharing a slide. Then click on the ellipsis icon on the Zoom control bar and select “disable annotation for others” in the drop-down menu.
Note: you have to enable this feature during the Vicious Circles exercise on Day 1 of the Landmark Forum.
5 — Making an index list of slides used in coaching
When the course leader is working with an individual participant, they may request that you bring up one of the slides from the PowerPoint file. For example, “Can you bring up The Structure for Inventing a Possibility slide, please?”
The index list is a quickest and surest way to find the correct slide. this will allow you to share the specific slide using the method that you have already practiced.
The index consists of the name of the slide and the slide number. Make sure that it is neat and legible, and place it where can refer to it quickly. e.g. I usually tape it to the edge of my monitor.
The list of coaching slides will be different each day, so you need to verify that you are working from the right list.
Some people may refer to the coaching slides as “flat slides.” This term was used to distinguish a version of a slide that did not have a PowerPoint animation. That distinction is not relevant anymore on courses where the Lader controls their own slides.
6 — Getting ready for the Team Pre-Flight Checklist meeting
Before you meet with your team prepare to ensure that you have organized yourself so that the meeting will go as efficiently as possible. Make sure that you take the following actions:
- Log on to the meeting a few minutes early and request to be co-hosted immediately.
- Check your internet connection speed and make a note of the results
- Share a slide from the PowerPoint and “Disable annotations for others.”
- Share the Welcome video and set the volume level appropriately.
(Open the Welcome video for the correct day, that way Zoom will remember the file location when you go to open it.) - Set up your working environment is set up in the same way that you have practiced. arrange your physical setup as well as the application windows on your computer in the same way that you have had it while practicing.
- Verify that you have the correct slide index list for the day.
“Have a great day!”